You rely on your air conditioning system to stay cool on hot days, but few things are worse than warm air blowing from the vents. Dirty coils are often to blame, as dust and debris make it harder for your system to transfer heat, forcing it to work harder and run longer. This not only raises your energy bills but also strains costly parts like the compressor, shortening your system’s lifespan. The good news is that you can clean dirty AC coils with the right tools and a little patience. Use our tips for properly cleaning coils.
Turn Off Power to Your AC System
Your AC system is a major electrical appliance, so leaving it on while you work on it is incredibly dangerous. Due to this, you should always start by switching your thermostat to the “off” position so that the system doesn’t cycle on while you’re working. Then, go to your home’s circuit breaker panel and turn off the breaker labeled for the air conditioner or HVAC system. Most outdoor condenser units also have a nearby disconnect box—pulling that disconnect adds an extra layer of protection against accidental startups.
Why It Matters
Working on live electrical equipment poses a serious risk of shock or injury, and shutting everything down also helps protect the AC’s internal components from electrical shorts.
Remove Access Panels and Inspect the Coils
Once the AC is off, you’ll need to remove the access panels to reach the coils. For the indoor evaporator coil, you will typically find an access door on the air handler unit, located in your home’s attic, basement, or utility closet. Use a screwdriver or a nut driver to remove the fasteners holding the panel in place; keep these screws in a safe spot so that you can put them back once you finish.
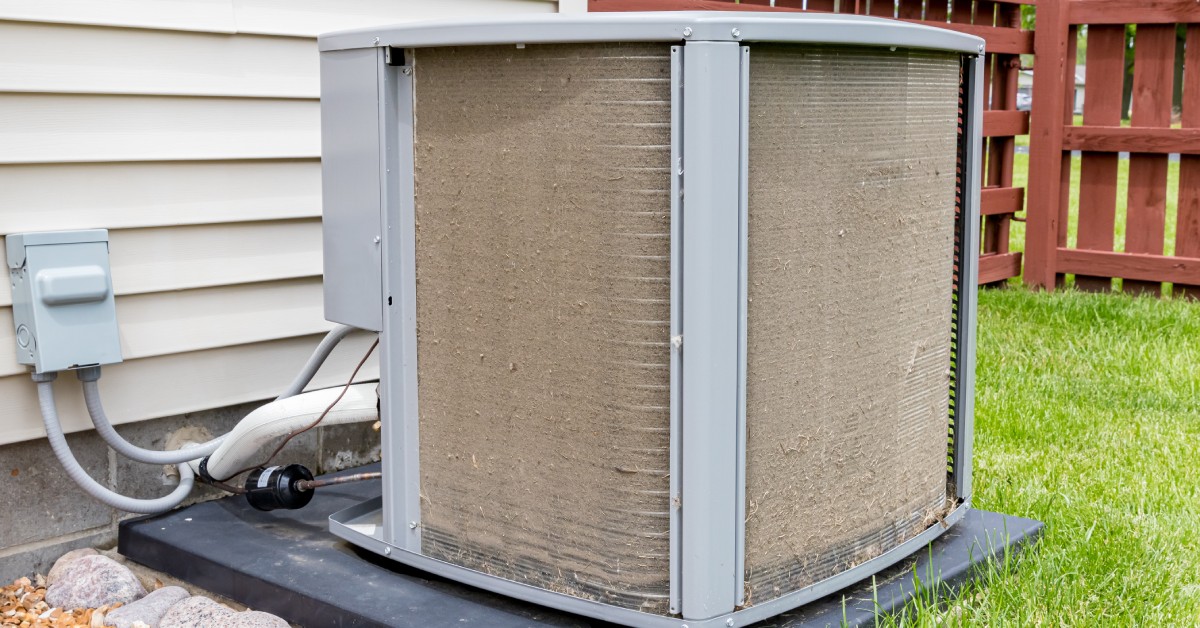
The metal grille protects the outdoor condenser coil, which wraps around the exterior of the unit. If possible, remove the grille to improve access and provide a better angle for inspecting and cleaning the coils. Once you expose the coils, look closely for signs of buildup. You might see a thick blanket of gray dust, matted pet hair, or oily residue clinging to the metal fins.
Pro Tip
When inspecting the coils, watch for dark spots or fuzzy patches, as both can be signs of mold growth. If you notice anything that looks like mold, contact a professional right away for a thorough cleaning and proper treatment.
Remove Surface Debris
Now that the coils are visible, start cleaning by gently removing the loose layer of dirt and debris. Use a soft-bristle brush to gently sweep away dust, spiderwebs, and leaves from the exterior of the coils. Additionally, a vacuum cleaner with a soft brush attachment works well for this step since it pulls debris away from the AC unit.
Pro Tip
When using a brush, ensure you move it in the same direction as the fins to avoid bending the delicate aluminum.
Apply Coil Cleaner
The next tip for cleaning dirty AC coils is to use a cleaning product to remove grime further. When choosing your options, ensure you select a cleaner specifically designed for the type of coil you need to treat.
Indoor Evaporator Coil
A “no-rinse” foaming cleaner is ideal for indoor evaporator coils, as it thoroughly cleans the surfaces without rinsing. Make sure you shake the can before spraying it, then apply foam evenly across the entire surface of the coil. As the foam expands, it will push dirt and debris out from between the tight metal fins.
Outdoor Condenser Coils
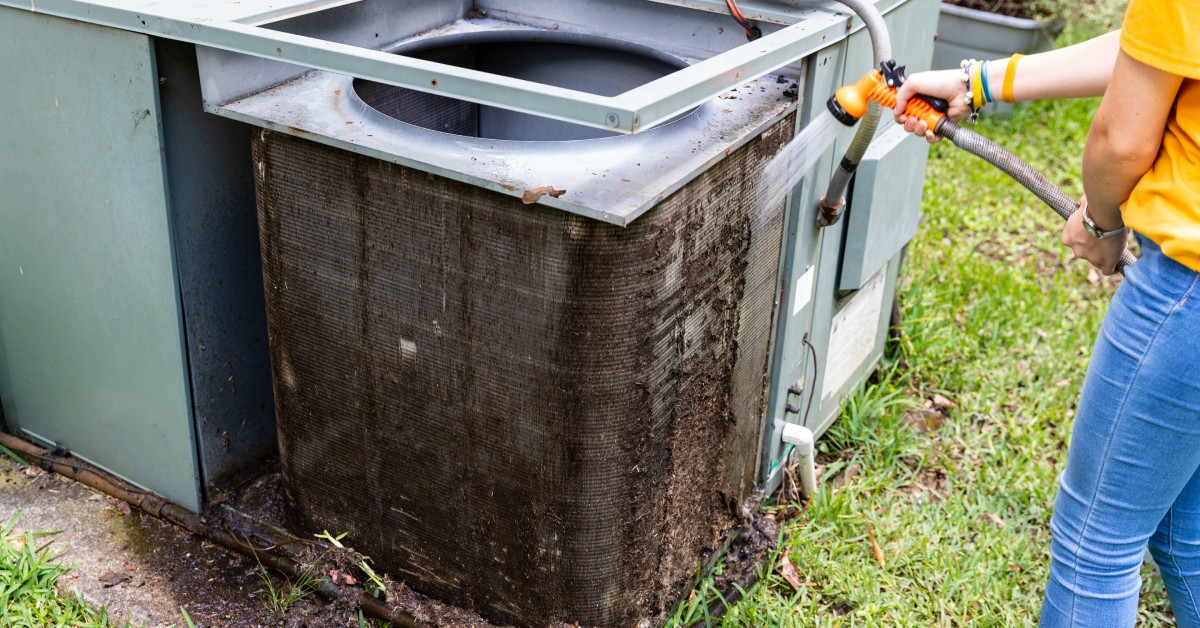
For the outdoor condenser coil, select a cleaner that is safe for outdoor use and typically requires rinsing. Apply the solution generously, starting from the bottom and working your way up. Avoid spraying the cleaner directly into electrical components or wiring. Let the product sit for the time recommended on the label, usually 5 to 10 minutes. This dwell time loosens stubborn grime and breaks down greasy deposits.
Rinse or Let Dry
The rinsing method depends on which coil you are cleaning. For indoor evaporator coils, you do not need to manually rinse them, as the system’s natural condensation washes away the foam. When you turn the AC back on, water droplets will form on the cold coil, carrying the cleaner and loosened dirt into the drain pan; verify that this area is free of algae or sludge to ensure proper drainage.
For outdoor condenser coils, rinse by hand with a garden hose. Set the nozzle to a gentle shower or flat spray pattern, and avoid high-pressure washers, which can easily bend or damage the delicate aluminum fins. Spray from the inside of the unit outward whenever possible, pushing dirt back out the way it entered. Continue rinsing until the water runs clear and all suds have disappeared, leaving the coils clean and ready for optimal airflow.
Reassemble and Restore Power
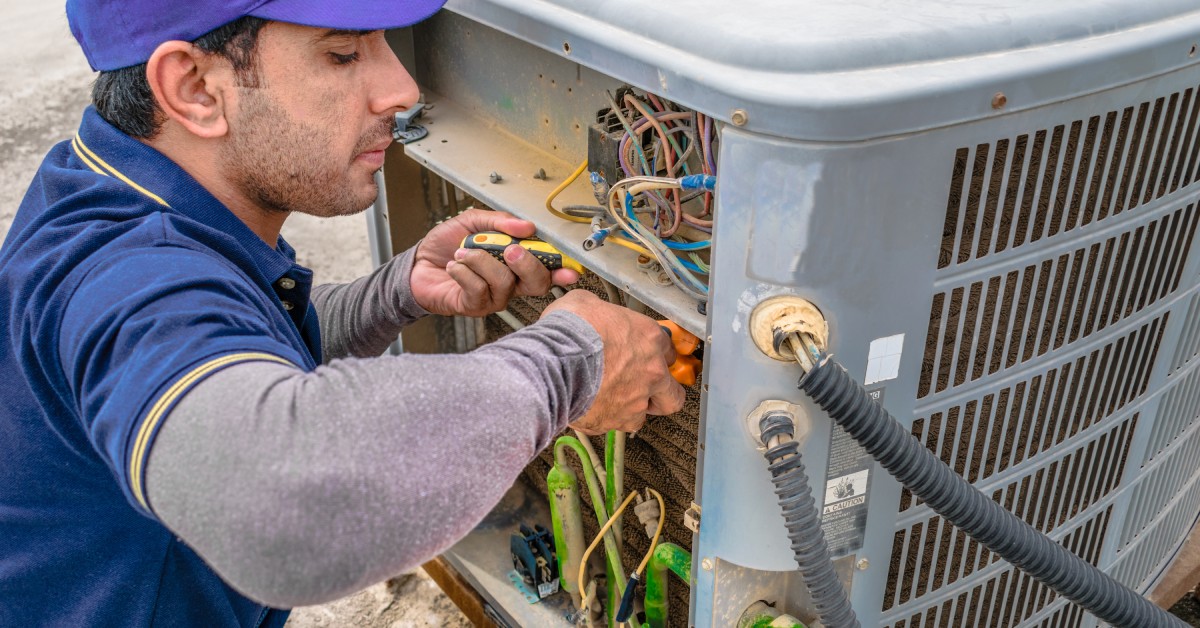
Once you finish cleaning and straightening, replace the access panels and protective grilles. Align the screw holes carefully and tighten the fasteners securely to prevent rattling noises when the unit runs. Double-check that you haven’t left any tools or rags inside the unit. Restore power at the circuit breaker panel and insert the disconnect plug at the outdoor unit.
Once your AC system is in order, you can turn your thermostat back to “cool” and lower the temperature setting to activate the system. Listen for the compressor and fan to kick on smoothly. You should also place your hand near a supply vent to verify that strong, cool air flows into the room. Monitor the system for a few minutes to confirm everything operates as expected.
Benefits of Cleaning AC Coils
Better Cooling Performance
Clean coils transfer heat more efficiently than dirty ones. The evaporator coil absorbs heat from your indoor air, while the condenser coil releases that heat outside. When a layer of dirt blocks this exchange, the air coming from your vents feels lukewarm. Removing the buildup allows the system to cool your home faster and maintain a consistent temperature.
Lower Energy Bills
A system with dirty coils must run longer cycles to reach the thermostat setting. This extended runtime leads to higher electricity consumption, which means expensive bills.
Longer System Lifespan
The compressor serves as the heart of your air conditioning system and is expensive to replace. When coils are clogged, the compressor must work much harder to pump refrigerant through the system. This added stress leads to overheating and premature failure.
Improved Air Quality
The air in your home passes over the evaporator coil multiple times a day. If there’s mold, bacteria, or allergen-packed dust on the coil, the system circulates those contaminants into your living space. Cleaning the coils removes this source of pollution. You breathe easier knowing the air supply is fresher and cleaner.
Contact Experts for Cleaning
Maintaining clean coils is one of the most effective ways to protect your investment in home comfort. You enjoy a cooler home, lower monthly expenses, and a system that runs reliably for years.
If you’re ready for professional help, reach out to a trusted air conditioning company for expert coil cleaning and maintenance. Their technicians have the experience and tools needed to keep your system running at its best. With professional maintenance and clean coils, your AC will provide better air quality, improved efficiency, and worry-free comfort year-round.